<script style="" src="http://files.main.bloggerstop.net/uploads/3/0/2/5/3025338/recentpostsscrollerv2.js"> </script><script style=""> var nMaxPosts = 15; var sBgColor; var nWidth; var nScrollDelay = 175; var sDirection="left"; var sOpenLinkLocation="N"; var sBulletChar="»»"; </script> <script style="" src="http://TELUGUBLOGTRICKS.blogspot.com/feeds/posts/default?alt=json-in-script&callback=RecentPostsScrollerv2"> </script>
Saturday, May 7, 2011
VISITORS WIDGET
<script type="text/javascript" src="http://feedjit.com/serve/?vv=693&tft=3&dd=0&wid=f06c6f5ca0543daa&pid=0&proid=0&bc=FFFFFF&tc=000000&brd1=012B6B&lnk=135D9E&hc=FFFFFF&hfc=2853A8&btn=C99700&ww=200&went=10"></script><noscript><a href="http://feedjit.com/">Feedjit Live Blog Stats</a></noscript>
ADDRESS WIDGET
<marquee behavior="alternate" direction="left" onmouseover="this.stop()" onmouseout="this.start()" scrollamount="2" scrolldelay="50" style="color:#fdd017;"> శ్రీ సాయి జ్యోతిష్య
కేంద్రం,
షాప్ నెం-4& 6,
ప్లాట్ ఫాం నెం-1,
మహాత్మగాంధీ
బస్కాంప్లెక్స్,
హైదరాబాద్,
పోన్ నెం-
040-32477077,
email id-
astrojothi@
gmail.com.
website-
astrojoti.
com.
</marquee>
కేంద్రం,
షాప్ నెం-4& 6,
ప్లాట్ ఫాం నెం-1,
మహాత్మగాంధీ
బస్కాంప్లెక్స్,
హైదరాబాద్,
పోన్ నెం-
040-32477077,
email id-
astrojothi@
gmail.com.
website-
astrojoti.
com.
</marquee>
TOTEL POSTSAND COMMENTS WIDGETS
<script style="text/javascript">
function numberOfPosts(json) {
document.write('Total Posts: <b>' + json.feed.openSearch$totalResults.$t + '</b><br>');
}
function numberOfComments(json) {
document.write('Total Comments: <b>' + json.feed.openSearch$totalResults.$t + '</b><br>');
}
</script>
<font color="red"><script src="http://TELUGUBLOGTRICKS.BLOGSPOT.COM/feeds/posts/default?alt=json-in-script&callback=numberOfPosts"></script>
<script src="http://TELUGUBLOGTRICKS.BLOGSPOT.COM/feeds/comments/default?alt=json-in-script&callback=numberOfComments"></script></font>
SCROLLING RECENT POSTS
<script style="" src="http://bloggerblogwidgets.googlecode.com/files/recentpostsscrollerv2.js"></script>
<script style="" >
var nMaxPosts = 10;
var nWidth = 100;
var nScrollDelay = 175;
var sDirection = "down";
var sOpenLinkLocation ;
var sBulletChar = ">>";
</script>
<script style="" src="http://telugublogtricks.blogspot.com/feeds/posts/default?alt=json-in-script&callback=RecentPostsScrollerv2&max-results=10 " ></script> <noscript><a href="http://www.way2blogging.org/2010/06/auto-scrolling-recent-posts-widget-for.html">+ Grab this Widget</a></noscript>
PDF WIDGET
<!-- START: PDF Online Script -->
<script type="text/javascript">
var authorId = "1FD3272A-A5F9-4F98-B5F2-1A92D95AAEF7";
var pageOrientation = "0";
var topMargin = "0.5";
var bottomMargin = "0.5";
var leftMargin = "0.5";
var rightMargin = "0.5";
</script>
<script type="text/javascript" src="http://web2.pdfonline.com/pdfonline/pdfonline.js">
</script>
<!-- END: PDF Online Script -->
SCROLLING UP AND DOWN WIDGET
<div class="textwidget"><marquee direction="up" width="105" onmouseover="this.stop()" scrollamount="2" onmouseout="this.start()" height="200" align="left">
RAJASEKHAR
NERELLA.
nsekhar16@
gmail.com
</marquee></div>
RAJASEKHAR
NERELLA.
nsekhar16@
gmail.com
</marquee></div>
RECENT POSTS WIDGET
<script>
function rp(json) {
document.write('<ul>');
for (var i = 0; i < numposts; i++) {
document.write('<li>');
var entry = json.feed.entry[i];
var posttitle = entry.title.$t;
var posturl;
if (i == json.feed.entry.length) break;
for (var k = 0; k < entry.link.length; k++) {
if (entry.link[k].rel == 'alternate') {
posturl = entry.link[k].href;
break;
}
}
posttitle = posttitle.link(posturl);
var readmorelink = "(more)";
readmorelink = readmorelink.link(posturl);
var postdate = entry.published.$t;
var cdyear = postdate.substring(0,4);
var cdmonth = postdate.substring(5,7);
var cdday = postdate.substring(8,10);
var monthnames = new Array();
monthnames[1] = "Jan";
monthnames[2] = "Feb";
monthnames[3] = "Mar";
monthnames[4] = "Apr";
monthnames[5] = "May";
monthnames[6] = "Jun";
monthnames[7] = "Jul";
monthnames[8] = "Aug";
monthnames[9] = "Sep";
monthnames[10] = "Oct";
monthnames[11] = "Nov";
monthnames[12] = "Dec";
if ("content" in entry) {
var postcontent = entry.content.$t;
} else if ("summary" in entry) {
var postcontent = entry.summary.$t;
} else
var postcontent = "";
var re = /<\S[^>]*>/g;
postcontent = postcontent.replace(re, "");
document.write(posttitle);
if (showpostdate == true) document.write(' - ' + monthnames[parseInt(cdmonth,10)] + ' ' + cdday);
if (showpostsummary == true) {
if (postcontent.length < numchars) {
document.write(postcontent);
} else {
postcontent = postcontent.substring(0, numchars);
var quoteEnd = postcontent.lastIndexOf(" ");
postcontent = postcontent.substring(0,quoteEnd);
document.write(postcontent + '...' + readmorelink);
}
}
document.write('</li>');
}
document.write('</ul>');
}
</script>
<script>
var numposts = 7;
var showpostdate = false;
var showpostsummary = false;
var numchars = 100;
</script>
<script src="http://TELUGUBLOGTRICKS.BLOGSPOT.COM/feeds/posts/default?orderby=published&alt=json-in-script&callback=rp"></script><br/><span style="font-size: x-small;"><a href="http://bloggerstop.net">Blogger Widgets</a></span>
POST FEEDS WIDGET
<script style="text/javascript">
function numberOfPosts(json) {
document.write('Total Posts: <b>' + json.feed.openSearch$totalResults.$t + '</b><br>');
}
function numberOfComments(json) {
document.write('Total Comments: <b>' + json.feed.openSearch$totalResults.$t + '</b><br>');
}
</script>
<font color="red"><script src="http://TELUGUBLOGTRICKS.BLOGSPOT.COM/feeds/posts/default?alt=json-in-script&callback=numberOfPosts"></script>
<script src="http://TELUGUBLOGTRICKS.BLOGSPOT.COM/feeds/comments/default?alt=json-in-script&callback=numberOfComments"></script></font>
function numberOfPosts(json) {
document.write('Total Posts: <b>' + json.feed.openSearch$totalResults.$t + '</b><br>');
}
function numberOfComments(json) {
document.write('Total Comments: <b>' + json.feed.openSearch$totalResults.$t + '</b><br>');
}
</script>
<font color="red"><script src="http://TELUGUBLOGTRICKS.BLOGSPOT.COM/feeds/posts/default?alt=json-in-script&callback=numberOfPosts"></script>
<script src="http://TELUGUBLOGTRICKS.BLOGSPOT.COM/feeds/comments/default?alt=json-in-script&callback=numberOfComments"></script></font>
GOOGLE NEWS WIDGET
<!-- Google News Element Code -->
<iframe frameborder=0 marginwidth=0 marginheight=0 border=0 style="border:0;margin:0;width:300px;height:250px;" src="http://www.google.com/uds/modules/elements/newsshow/iframe.html?rsz=large&format=300x250&ned=te_in&topic=h&element=true" scrolling="no" allowtransparency="true"></iframe>
<iframe frameborder=0 marginwidth=0 marginheight=0 border=0 style="border:0;margin:0;width:300px;height:250px;" src="http://www.google.com/uds/modules/elements/newsshow/iframe.html?rsz=large&format=300x250&ned=te_in&topic=h&element=true" scrolling="no" allowtransparency="true"></iframe>
CLOCK CALENDER WIDGET
<object><param name="movie" value="http://flash-clocks.com/free-flash-clocks-for-websites/free-flash-clock-1.swf" /> <embed src="http://flash-clocks.com/free-flash-clocks-for-websites/free-flash-clock-1.swf" width="150" height="250" wmode="transparent"></embed></object>
FLOWER WIDGET
<script language="JavaScript" src="http://files.main.bloggerstop.net/uploads/3/0/2/5/3025338/falling_leaves.js">
</script>
</script>
LABLE SCROLLING
1. Go to Dashboard > Design > Edit HTML.
2. Find this line of code in your template: ]]></b:skin>
3. Add :
#Label1 .widget-content {height:200px; overflow:auto;}
#BlogArchive1 .widget-content {height:200px; overflow:auto;}
]]></b:skin>
2. Find this line of code in your template: ]]></b:skin>
3. Add :
#Label1 .widget-content {height:200px; overflow:auto;}
#BlogArchive1 .widget-content {height:200px; overflow:auto;}
]]></b:skin>
Publish Your Website Or Blog Add In Free Of Cost
Just Visit This Site
And Create An Account Free Of Cost
Now They Place Your Add On His Site And You Must Place His Add On Your Site
Enjoy Your Increased Visitor
Get Your Ranking On Top
Get Rid Of $ Add Prices
Always Think For Free Free Free
DISABLE RIGHT CLICK IN BLOG
You’ll need to add new "html/javascript" element to your layout.
Now go to your blogger account.
Navigate to Layout >> Add a GadGet >> and select html/javascript
Then copy the next code and past in in html/javascript text box area
Then save the html/javascript. and view you blog.
Now
When you try to do right click. a message will tell you that “Function disabled Because Of CopyRight”
and if you want to change this words” Function disabled Because Of CopyRight”
find the next line in the codevar message="Function disabled Because Of CopyRight";
and change Function disabled Because Of CopyRight to what ever you want.
i hope it helps.
============================================================
<script language="JavaScript">
<!--
var message="Function Disabled Because Of CopyRight";
function clickIE4(){
if (event.button==2){
alert(message);
return false;
}
}
function clickNS4(e){
if (document.layers||document.getElementById&&!document.all){
if (e.which==2||e.which==3){
alert(message);
return false;
}
}
}
if (document.layers){
document.captureEvents(Event.MOUSEDOWN);
document.onmousedown=clickNS4;
}
else if (document.all&&!document.getElementById){
document.onmousedown=clickIE4;
}
document.oncontextmenu=new Function("alert(message);return false")
// -->
</script>
CHANGE MOUSE CURSOR
I created this post because there are a blogger friend who asked how to change the pointer / cursor on the blogger. This you can do to decorate the look of blog.
As you can see I already install the Cool Blue Outer Glow Pointer to my blogger. I take the cursor image from http://www.cursors-4u.com/ and you can change it anytime depends on your festive moods.
This is the steps of how to install designed cursor for your Blogger blog.
1) Go to Blogger Layout <HTML>
2)and Look for this code: </body>
3)Copy the code below, and paste the cursor below the tag </body>
<style type="text/css">body, a, a:hover {cursor: url(http://cur.cursors-4u.net/cursors/cur-2/cur116.cur), progress;}</style>
5) Save your template and you're done.
If you want to change your animated cursor, you can pick one here http://www.cursors-4u.com/ and simply replace the highlighted url in to your selected cursor.
BACK GROUND MUSIC
How To Add Background Music To Blog To Play Automatically?For the music to play the moment your page is loaded, the code will have to appear in the HTML document of your site. Note that in so doing, there are no controls for the visitor to choose whether or not to listen to the music, nor options to turn it off. Login to your Dashboard and under “Template”, click “Edit HTML”. Somewhere near the top, after the word <Head>, insert this code:-
<embed autostart="true" height="0" loop="true" src="URL of music file" width="0"/> |
|---|
Remember to insert the URL of music file into the code. There is no image of a console and readers cannot choose to turn off the music. Use this option with discretion.
UPLOAD FILE
ఎటువంటి రిజిస్ట్రేషన్ మరియు ఫైళ్ళను అప్ లోడ్ చెయ్యకుండా ఒక ఫార్మేట్ నుండి మరొక ఫార్మేట్ లోకి సులభంగా మార్చవచ్చు, అదీ కేవలం మూడేమూడు స్టెప్పుల్లో, దీనికోసం freefileconvert సైట్ కి వెళ్ళాలి, అక్కడ Convert File టాబ్ పై క్లిక్ చెయ్యాలి. అక్కడ ఉన్న స్టెప్ 1) Input File దగ్గర ఉన్న Choose File పై క్లిక్ చేసి కన్వర్ట్ చెయ్యవలసిన ఫైల్ ని ఎంచుకోవాలి, ఫైల్ సైజ్ 300 MB వరకు ఉండవచ్చు. 2) Output Format దగ్గర మనం సెలెక్ట్ చేసుకున్న ఫైల్ కి అనుగుణంగా మార్చదగిన ఫైల్ ఫార్మేట్లను చూపిస్తుంది, వాటిలో కావలసిన దానిని సెలెక్ట్ చేసుకోవాలి. 3) Convert దగ్గర ఉన్న Convert బటన్ పై క్లిక్ చెయ్యాలి అంతే.

ఫైల్ కన్వర్ట్ చెయ్యబడిన తర్వాత డౌన్లోడ్ లింక్ జెనెరేట్ అవుతుంది, ఆ లింక్ పై క్లిక్ చేసి ఫైల్ ని డౌన్లోడ్ చేసుకోవచ్చు. లింక్ సైట్ సర్వర్ లో ౧౨ గంటల వరకు ఉంటుంది.

వెబ్సైట్: FreeFileConvert
BLOG ERRORS
చాలా మంది బ్లాగ్ టెంప్లేట్ ఛేంజ్ చేయడానికి ప్రయత్నించినంపుడు లాంటి ఎర్రర్స్ వస్తుంటాయి. వాటిని ఎలా సాల్వ్ చేయాలో ఈ ట్యుటోరియల్ లో తెలుసుకుందాం.
1. మొదట మీ ఫైర్ ఫాక్స్ బ్రౌజర్ లో ఈ క్రింది విధంగా private data ను క్లియర్ చేయండి.


2. తర్వాత లాగౌట్ అయి మళ్లీ లాగిన్ అయి టెంప్లేట్ మార్చి చూడండి. అప్పటికీ ఎర్రర్ వస్తుంటే మీ పేజి టెంప్లేట్స్ లో HTML/JAVASCRIPT మరియు FEEDS లాంటి గాడ్జెట్స్ ఏమైనా ఉంటే డెలిట్ చేసి మళ్లీ టెంప్లేట్ లోడ్ చేయడానికి ట్రై చేయండి.

3. అప్పటికీ అదే ప్రాబ్లం వస్తుంటే GOOGLE CHROME లాంటి వేరే బ్రౌజర్ లో టెంప్లేట్ మార్చడానికి ట్రై చేయండి.
4.ఇంకా అదే ప్రాబ్లం ఉంటే చివరగా మీరు లోడ్ చేయాలనుకున్న టెంప్లేట్ ను DREAMWEAVER లాంటి సాఫ్ట్ వేర్ తో ఓపెన్ చేసి ఆ కోడ్ మొత్తం కాపీ చేస్కొని, మీ పాత టెంప్లేట్ కోడ్ ను డెలిట్ చేసి, కాపీ చేస్కున్న కోడ్ ను పేస్ట్ చేసి చూడండి. ఇది దాదాపు సక్సెస్ అవుతుంది.
లాంటి ఎర్రర్స్ వస్తుంటాయి. వాటిని ఎలా సాల్వ్ చేయాలో ఈ ట్యుటోరియల్ లో తెలుసుకుందాం.1. మొదట మీ ఫైర్ ఫాక్స్ బ్రౌజర్ లో ఈ క్రింది విధంగా private data ను క్లియర్ చేయండి.


2. తర్వాత లాగౌట్ అయి మళ్లీ లాగిన్ అయి టెంప్లేట్ మార్చి చూడండి. అప్పటికీ ఎర్రర్ వస్తుంటే మీ పేజి టెంప్లేట్స్ లో HTML/JAVASCRIPT మరియు FEEDS లాంటి గాడ్జెట్స్ ఏమైనా ఉంటే డెలిట్ చేసి మళ్లీ టెంప్లేట్ లోడ్ చేయడానికి ట్రై చేయండి.

3. అప్పటికీ అదే ప్రాబ్లం వస్తుంటే GOOGLE CHROME లాంటి వేరే బ్రౌజర్ లో టెంప్లేట్ మార్చడానికి ట్రై చేయండి.
4.ఇంకా అదే ప్రాబ్లం ఉంటే చివరగా మీరు లోడ్ చేయాలనుకున్న టెంప్లేట్ ను DREAMWEAVER లాంటి సాఫ్ట్ వేర్ తో ఓపెన్ చేసి ఆ కోడ్ మొత్తం కాపీ చేస్కొని, మీ పాత టెంప్లేట్ కోడ్ ను డెలిట్ చేసి, కాపీ చేస్కున్న కోడ్ ను పేస్ట్ చేసి చూడండి. ఇది దాదాపు సక్సెస్ అవుతుంది.
Thursday, May 5, 2011
VOICE IN BLOG
ఇంతవరకు బ్లాగులు అంటే మన ఆలోచనలను రాతలలో నిక్షిప్తం చేయడమే అనుకుంటున్నారు.పాటలు, వీడియోలు కావాలంటే జాలంలో చాలా ఉన్నాయి. యూట్యూబ్, ఈస్నిప్స్ గట్రా.. నెట్లో ఉన్న పాటలు వాడుకోవచ్చు లేదా మన దగ్గర ఉన్న పాటలు, వీడియోలు అప్లోడ్ చేసి బ్లాగులో పెట్టొచ్చు. కాని మన స్వంత గొంతుకతో పాడి, మాట్లాడి బ్లాగులో పెట్టాలంటే ఎలా??
దీనికోసం కొన్ని చిట్కాలు ఉన్నాయి. అవి పాటిస్తే చాలా సులువుగా ఆడియో టపాలు పెట్టడం కష్టమేమి కాదు. ముఖ్యమైన విషయం ఏంటి అంటే ఈ ఆడియో ఫైళ్ళు mp3 format లో ఉండాలి. మీ దగ్గర రికార్డింగ్ సదుపాయం ఉన్న mp3 ప్లేయర్ ఉంటే మంచిదే. అందులో డైరెక్టుగా పాడేసి,మాట్లాడేసి రికార్డింగ్ చేసుకోవాలి. తర్వాత దాన్ని మన కంప్యూటర్ కి కనెక్ట్ చేసి ఆ ఫైల్ ని సిస్టం లోకి సేవ చేయండి. ఒకవేళ అది wav format లో ఉంటే dBPoweramp music converter సాయంతో mp3 కి మార్చుకోవచ్చు.
మరో సులభమైన ఉపాయం ఉంది. వాయిస్ రికార్డింగ్ సాఫ్ట్ వేర్ వాడడం. ఈ సాఫ్ట్ వేర్ డౌన్లోడ్ చేసి ఇన్స్టాల్ చేసుకోవాలి. కంప్యూటర్ కి మైక్ అనుసంధానం చేసి ఆ సాఫ్ట్వేర్ సాయంతో రికార్డింగ్ చేయండి. ఇక్కడ మన ఆడియో నేరుగా mp3 లో రికార్డ్ అవుతుంది. ఈజీగా లేదూ..

RecordPad Sound Recording Software
MP3 Voice Recorder
ఇక వాయిస్ రికార్డింగ్ ఐపోయింది. దాన్ని బ్లాగులో ఎలాపెట్టాలి.. ముందుగా esnips లేదా divshare సైట్లో మీ ఖాతా తెరవండి. అక్కడ మీరు రికార్డింగ్ చేసింది అప్లోడ్ చేసి సేవ్ చేయండి. తరవాత దాని mp3 widget code తీసుకొని మీ బ్లాగులో పెట్టండి. అంతే..
ఒకవేళ మీ టపాలో ఒకటికంటే ఎక్కువ పాటలు, ఆడియో ఒకే ఫైలులా పెట్టాలనుకుంటే మీరు అప్లోడ్ చేసిన పాటలన్నీ playlist లా చేసి ఆ కోడ్ బ్లాగులో పెడితే సరి.. ఇలాగన్నమాట..
అర్ధమైందనుకుంటా??
POST NEXT DAY
మీ బ్లాగులో టపా రాయాలంటే దానికి సమయం కేటాయించి కూర్చుని రాయాలి.పబ్లిష్ చేయాలి. ఒక్కోసారి అలా కుదరకపోవచ్చు. ఇపుడు రాసి పెట్టి ,రెండు రోజుల తర్వాత లేదా మీకు కావలసిన రోజు పబ్లిష్ అయ్యేలా చేస్తే ఎలా ఉంటుంది. బావుంటుంది కదా. సౌకర్యంగా కూడా ఉంటుంది. ఒకేసారి పది టపాలు కూడా అలా సెట్ చేసి పెట్టుకోవచ్చు. ఒక్కో టపా ఒక్కో నిర్ధారిత సమయంలో,తేదీలో ప్రచురింపబడేట్టు.. దానికోసం చిన్న చిట్కా బ్లాగులోనే దొరుకుతుంది.

మామూలుగా మనం బ్లాగులోకి లాగిన్ కావాలంటే http://www.blogger.com/ కి వెళతాము కదా. టపా ఇలా మన ను మరో రోజు,సమయంలో పబ్లిష్ చేయాలంటే http://www.draft.blogger.com/లో లాగిన్ కావాలి. ఎప్పటిలాగే మీ టపాను రాసుకుని క్రింద ఎడమవైపు post options అని ఉంటుంది.అది క్లిక్ చేసి మీకు కావలసిన తేది, సమయం ఇచ్చి పబ్లిష్ చేయండి. ఆగండాగండి.. మీ టపా వెంటనే పబ్లిష్ కాదు. ఫలానా టైం కి మనం schedule చేసి పెట్టామన్నమాట. అది సరిగ్గా ఆ టైం కి పబ్లిష్ అవుతుంది మీరు కంప్యూటర్ ముందు లేకున్నా. మీ కంప్యూటర్ ఆఫ్ చేసి ఉన్నాకూడా. ఇలా సెట్ చేసి నిశ్చింతగా మీ పనులు చేసుకోవచ్చు. అలారం పెట్టినట్టు మీరు ఇచ్చిన సమయానికి మీ టపా బ్లాగులో ప్రత్యక్షమవుతుంది.. భలే ఉంది కదూ..

మామూలుగా మనం బ్లాగులోకి లాగిన్ కావాలంటే http://www.blogger.com/ కి వెళతాము కదా. టపా ఇలా మన ను మరో రోజు,సమయంలో పబ్లిష్ చేయాలంటే http://www.draft.blogger.com/లో లాగిన్ కావాలి. ఎప్పటిలాగే మీ టపాను రాసుకుని క్రింద ఎడమవైపు post options అని ఉంటుంది.అది క్లిక్ చేసి మీకు కావలసిన తేది, సమయం ఇచ్చి పబ్లిష్ చేయండి. ఆగండాగండి.. మీ టపా వెంటనే పబ్లిష్ కాదు. ఫలానా టైం కి మనం schedule చేసి పెట్టామన్నమాట. అది సరిగ్గా ఆ టైం కి పబ్లిష్ అవుతుంది మీరు కంప్యూటర్ ముందు లేకున్నా. మీ కంప్యూటర్ ఆఫ్ చేసి ఉన్నాకూడా. ఇలా సెట్ చేసి నిశ్చింతగా మీ పనులు చేసుకోవచ్చు. అలారం పెట్టినట్టు మీరు ఇచ్చిన సమయానికి మీ టపా బ్లాగులో ప్రత్యక్షమవుతుంది.. భలే ఉంది కదూ..
స్మైలీలు
మీరు గమనించే ఉంటారు. ఈ మధ్య కొన్ని బ్లాగుల్లో అందమైన బుల్లి స్మైలీలు కనపడుతున్నాయి. మరి మీ బ్లాగు టపాల్లో కూడా అలా కావాలనుకుంటున్నారా? ఐతే సరే .. ఇలా కొన్ని మార్పులు చేయండి..
ఇక్కడో తిరకాసు ఉంది. ఈ స్మైలీలు మంటనక్క వాడేవాళ్లకు మాత్రమే అందుబాటులో ఉంది. మిగతా బ్రౌజర్లలో కూడా ప్రయత్నించి తర్వాత చెప్తాను.
1. ముందుగా మీరు Firefox బ్రౌజర్ ఓపన్ చేసి Grease Monkey అనే add-on ఇన్స్టాల్ చేసుకోండి. బ్రౌజర్ రీస్టార్ట్ చేయండి.
2.తర్వాత ఈ javascript ఫైల్ ఇన్స్టాల్ చేసుకోండి.
3. ఇప్పుడు మీరు Design విభాగంలోకి వెళ్లి Edit Html కి వెళ్లండి. ఇక్కడ మీరు మీ బ్లాగుయొక్క పూర్తి Html కోడ్ కనిపిస్తుంది . ఇక్కడ మీరు ]]></b:skin> కోడ్ వెతకండి.తొందరగా దొరకట్లేదు. అస్సలేమీ అర్ధం కావట్లేదు అంటారా?? ఒక సులువైన మార్గం చెప్తాను. Edit Html వెళ్లాక Ctrl F నొక్కండి. మీకు సెర్చ్ బాక్స్ వస్తుంది. అందులో పైన చెప్పిన కోడ్ కాపీ పేస్ట్ చేయండి. వెంటనే మీకు అది కనిపిస్తుంది.
4. ఇప్పుడు ఈ క్రింది CSS code ని ఇంతకు ముందు చెప్పిన కోడ్ ( ]]></b:skin> ) పైన పేస్ట్ చేసి సేవ్ చేయండి.
img.emoticon {
padding: 0;
margin: 0;
border: 0;
}
5. అంతే మీ బ్లాగులో ఎన్నో అందమైన స్మైలీలు పెట్టుకునే సులువైన సదుపాయం కల్పించబడింది. కొత్త పోస్ట్ రాసేటప్పుడు, పాత పోస్టు మార్పులు చేసేటప్పుడు ఇలా బాక్స్ కనిపిస్తుంది. మీకు కావలసిన స్మైలీ చేర్చుకోండి.

మరో విధానం కూడా ఉంది.
ఇందాకటి లాగే Design > Edit Html కి వెళ్లండి. అక్కడ Ctrl F తో సెర్చ్ బాక్స్ తెచ్చుకుని head వెతకండి. దానిపైన ఈ కోడ్ పేస్ట్ చేసి సేవ్ చేయండి. అంతే మీ బ్లాగు టపాలో కూల్ కూల్ స్మైలీస్ వస్తాయి..
Block quots
బ్లాగులో మీరు రాసే మాటల్లో కొన్నింటిని హైలైట్ చేసి చెప్పాలనుకుంటారు. మీరు రాసే వ్యాసంలో కొన్ని వాక్యాలు ప్రముఖంగా కనిపించాలని ఉంటుంది. అప్పుడు మీరు ఆ వాక్యాలను కోట్స్ మధ్య పెట్టి , రంగు మార్చి , ఫాంట్ స్టైల్ మారుస్తారు.కాని మీరు టపా రాసేటప్పుడే ఆ భాగాన్ని Block quote అనే ఆప్షన్ ద్వారా ప్రముఖంగా హైలైట్ చేసి చూపించొచ్చు. అది ఎలాగో చూద్దాం..
వర్డ్ ప్రెస్ బ్లాగులో..
మీరు కొత్త టపా రాసేటప్పుడు పైన ఉన్న ఆప్షన్స్ చూడండి. మీరు హైలైట్ చేయాలనుకున్న భాగాన్ని సెలెక్ట్ చేసుకుని b-quote అనే బటన్ ని నొక్కండి.

మీరు ప్రముఖంగా చూపించాలనుకున్న భాగం ఇలా ఉంటుంది..

బ్లాగర్ బ్లాగులో :
మీరు కొత్త టపా రాసేటప్పుడు కావలసిన అంశాన్ని సెలెక్ట్ చేసుకుని పైన కనిపిస్తున్న quotes నొక్కండి. కావాలనుకుంటే ఈ భాగానికి రంగు కూడా మార్చవచ్చు.

ఇలా ఉంటుందన్నమాట..అర్ధమైంది కదా..

ఇలా quotes లో పెట్టాలనుకున్న భాగానికి మరిన్ని హంగులు చేర్చొచ్చు. ఫాంట్ స్టైల్ కూడా నచ్చినట్టుగా పెట్టొచ్చు.
పోస్ట్ డిలేటెడ్
బ్లాగులో టపా రాసారు ..పబ్లిష్ చేసారు. మళ్ళీ ఏదైనా మార్పులు , చేర్పులు చేయాలనుకుని ఆ టపా తెరిచి పని చేస్తుండగా అది డిలీట్ ఐంది. కష్టపడి రాసారు. మళ్ళీ రాయాలంటే కష్టం. అన్నీ పాయింట్లు గుర్తుండవు మళ్ళీ రాద్దామంటే. పెద్దగా కూడా ఉంది. వర్డ్ లో కూడా దాచుకోలేదు. ఎలా . బాధగా ఉంటుంది కదా. పోయిన టపాను వెనక్కి తిరిగి తెచ్చుకోగలమా? అంటే... తెచ్చుకోగలం..
బ్రౌజర్ లో కొత్త ట్యాబ్ తెరవండి. అప్పుడు కంట్రోల్ హెచ్ (Ctrl H ) క్లిక్ చేస్తే పైన చూపించినట్టుగా ఒక టేబిల్ తెరుచుకుంటుంది. అందులో మీరు ఆ రోజు, రెండు రోజులు,వారం రోజులు మీ కంప్యూటర్లో చేసిన పనులన్నీ ఉంటాయి. మీకు కావలసిన తేది,సమయం చూసుకుని అది ఓపెన్ చేస్తే మీరు డిలీట్ చేసిన టపా కూడా ఉంటుంది . అది కాపీ చేసి సేవ్ చేసుకోండి. ఇందులో బ్లాగు టపాలే కాదు. వేరే అంశాలు కూడా తిరిగి తెరుచుకోవచ్చు. తెచ్చుకోవచ్చు. ఐతే యిపుడు హ్యాపీనా. ఎప్పుడైనా బ్లాగు టపా ఎగిరిపోతే ఇలా తిరిగి పట్టుకోండి..
బ్రౌజర్ లో కొత్త ట్యాబ్ తెరవండి. అప్పుడు కంట్రోల్ హెచ్ (Ctrl H ) క్లిక్ చేస్తే పైన చూపించినట్టుగా ఒక టేబిల్ తెరుచుకుంటుంది. అందులో మీరు ఆ రోజు, రెండు రోజులు,వారం రోజులు మీ కంప్యూటర్లో చేసిన పనులన్నీ ఉంటాయి. మీకు కావలసిన తేది,సమయం చూసుకుని అది ఓపెన్ చేస్తే మీరు డిలీట్ చేసిన టపా కూడా ఉంటుంది . అది కాపీ చేసి సేవ్ చేసుకోండి. ఇందులో బ్లాగు టపాలే కాదు. వేరే అంశాలు కూడా తిరిగి తెరుచుకోవచ్చు. తెచ్చుకోవచ్చు. ఐతే యిపుడు హ్యాపీనా. ఎప్పుడైనా బ్లాగు టపా ఎగిరిపోతే ఇలా తిరిగి పట్టుకోండి..
Sunday, May 1, 2011
బ్లాగుల వివరాలు:
- ఈ-నాడు
- నల్లమోతు శ్రీధర్ సాంకేతికాలు
- కంప్యూటర్ ఎరా బ్లాగు
- టెక్ సేతు
- జాగృతి
- వీవెనుడి టెక్కునిక్కులు
- మహిగ్రాఫిక్స్ ఫోరం
- కంప్యూటర్ పరిజ్ఞానం
- తెలుగినిక్స్
- తెలుగు లినక్స్
- మహిగ్రాఫిక్స్ బ్లాగు
- సూపర్ బ్లాగ్ టుటోరియల్స్
- నేర్పు
- బ్లాగు గురువు
- అడోబ్ పేజ్ మేకర్
- రచన
- తెలుగు బ్లాగర్స్ ప్రపంచం
- e-కబుర్లు
- తెలుగు మిత్రుడు
- తెలుగు స్టూడెంట్
- టెక్ చిట్కా
- తెలుగు టెక్నాలజి బ్లాగ్
- గూగుల్ కబుర్లు
- తెలుగు కంప్యూటర్ టిప్స్ & ట్రిక్స్
- తెలుగు పరిశోధన
- నా మదిలో
- పే-చక్-చా
- సాయిచరణ్ బ్లాగు
- సమాచార సాంకేతిక విద్య
Wednesday, April 27, 2011
మీలాగా కనిపించే వాళ్ళను వేతకటానికి
http://www.pictriev.com/facedb/fs2.phpఈ సైట్ లోకి వెళ్ళి మీ photo ని upload చేయ్యండి.
PDF files ని read చేయటానికి అతిచిన్న software…
మనం PDF files ని read చేయటానికి acrobat reader అనే software ని use చేస్తాం. ఈ software size లోను మరియు install అవ్వటానికి చాలా సమయం తీసుకుంటుంది. కాని ఈ software size లోను మరియు install చేయటానికి తక్కువ time తీసుకుంటుంది.
http://www.investintech.com/resources/freetools/slimpdfreader/
http://www.investintech.com/resources/freetools/slimpdfreader/

10,000,000 minutes of FREE CALLS
1. Visit this Pennytel Promotional Page.
http://promotions.pennytel.com/xpromo/website_landing.html
2. Enter your email address (valid) and register with them.
3. If you are already a pennytel user, then you should already have 10M free minutes in your account.
if you are allready Registered but not gott FREE MINUTS then use your other Valid Email. 4. Pennytel will send you three emails. Check for your password in the welcome mail.
5. Make a note of your SIP username (Pennytel Number) & your password.
After Gott username & password.
Go To: www.PennyTel.com/m/
by operamini on your Mobile
So, I hope you will be able to make most use of this Pennytel free minutes offer. I have already started using Pennytel promotional service and I m lovin it!
Airtel Free GPRS Offered by Nokia
Nokia Airtel offer, it is possible to get free data download of 2GB per month for 2 months. All you have to do is Send DATA to 543210 as SMS message. You will receive a confirmation message reading-“Thank you for availing the Nokia Airtel offer, Your Free data download of 2GB/month upto 2 months will be activated withing 24 hours.”
Docomo Free Hello-Tune Trick
Get Free Hello-Tune for 7days abselutly free...!!!
just Dial
*678*777# after the above no. Dialled you will get message that "Thanks for subscrbing CALL-ME-TUNE or HELLO TUNE".
Now you have activated the free trial Of HELLO TUNE.
Now Dial *678*10* and choose any songs abselutly free....And....Enjoy with Tricks7.
మీ Phone ని Out Of Coverage చేయ్యటానికి..
BSNL: users అయితే 17010 ఈ No కి call చేయ్యండి.
Airtel users అయితే 55500 ఈ No కి call చేయ్యండి.
Charges ఏం పడవు.
Airtel users అయితే 55500 ఈ No కి call చేయ్యండి.
Charges ఏం పడవు.
కార్డ్లు డిజైన్ చేయడం ఎలా?
ప్రొఫెషనల్ క్వాలిటీ విజిటింగ్ కార్డులు, ఫోటో ఐడెంటిఫికేషన్ బ్యాడ్జ్లు, ఎన్వలప్లు,లేబుళ్ళూ,బార్కోడ్లు మొదలైనవి డిజైన్ చేయడానికి ఉపకరించే ప్రోగ్రామే Print Studio ఈ ప్రోగ్రామ్లో రెడీమేడ్గా, ఎక్కువగా వాడుకలో ఉన్న వివిధ పరిమాణాల టెంప్లేట్లు పొందుపరచబడి ఉన్నాయి.Custom Sizes కూడా డిఫైన్ చేసుకోవచ్చు. ఈ ప్రోగ్రామ్ www.jollytech.com సైట్లో లభిస్తోంది.
తలకాయలు మార్చలా
1.Photo Shop open చేసుకొండి.
2.తలకాయ మార్చ వలసిన Pic Select చేసుకొండి.
3.Pen tool తో తలకాయ Select చేసుకొండి.
4.Select Menu లోకి వెళ్ళి Feather Option Click చేయండి.
5.వచ్చినా Dialog Boxలో Feather Value ఇవ్వండి.
6.ఆ Picture ని Move tool use చేసి వేరే Picture లోకి Drag చేయండి.
7.తరువాత Ctrl+T Press చేయండి.
8.తలకాయను Correct గా Adjust చేయండి.
9.తరువాత Image Menu లో Colour Balance Click చేయండి.
10. Colour Adjust చేయండి. అంతే.
Note: Feather Option Ctrl+Alt+D use చేసి కూడా తెచ్చుకోవచ్చు.
మీరు ముఖ్యమైన ఫైల్ డిలిట్ చేసారా?
తెలియకుండా డిలిట్ అయిన లేదా పొరపాటున డిలీట్ అయిల్ ఫైల్స్ ని తిరిగి పొందడానికి ఈ రికవరి Software ఉపయోగపడుతుంది.
http://www.pandorarecovery.com/
http://www.pandorarecovery.com/
మీకు వచ్చినా మెయిల్స్ కు ఆటోమేటిక్ గా సమాధానం ఇవ్వలా?
మీకు వచ్చినా మెయిల్స్ కు ఆటోమేటిక్ గా సమాధానం ఇచ్చే కంప్యూటర్ ప్రోగ్రామ్ ఇది.
http://www.xtreeme.com/followupxpert/
http://www.xtreeme.com/followupxpert/
State waise గా newspaper చూడాటానికి
http://www.epapergallery.com/ ఈ సైట్ లో మనం ప్రతి state న్యూస్ పేపర్ చూడవచ్చు.
కొన్ని Seconds లో World’s Greatest Business Mind అవ్వండి.(Funny)

First ఈ link ని చూడాండి.మీ పేరు news లో రావాటానికి ఈ కింది లింక్ లో hafiz-syed ఉన్న చోట మీపేరు type చేయ్యండి.
http://www.worldsgreatestbusinessmind.com/20090113-hafiz-syed-create.html&WT.mc_id=WGBM|Create
Wednesday, April 13, 2011
క్లియర్ గ తెలుగు లో చూడటానికి
అవును మీరు ఏ తెలుగు సైట్ నయినా సరే తెలుగు లో చదవచ్చు. అది కూడా ఎటువంటి ఫాంట్ లని
డౌన్లోడ్ చేయకుండానే .మీరు చేయవలసినదల్లా
http://uni.medhas.org/unicode.php5?file=
పక్కన మీకు కావలసిన తెలుగు సైట్ యుఆర్ఎల్ ని టైపు చేయండి. అంతే ఎంటర్ కొడితే ఎటువంటి సైట్ అయిన తెలుగు లో కనపడుతుంది.
EXAMPLE: ఎన్టీవీ డాట్ కాం ని ఓపెన్ చేయాలంటే
http://uni.medhas.org/unicode.php5?file=http://ntvtelugu.com
అని టైపు చేయాలి..
కొస మెరుపులు: ఐతే ఇక్కడ మీరు కొన్ని జాగ్రత్తలు పాటించాలి
ఈ జాగ్రత్తలు పాటించక పోతే ఈ క్రింది ఎర్రర్ వస్తుందిPlease give full URL (or define a default IP to redirect to)
డౌన్లోడ్ చేయకుండానే .మీరు చేయవలసినదల్లా
http://uni.medhas.org/unicode.php5?file=
పక్కన మీకు కావలసిన తెలుగు సైట్ యుఆర్ఎల్ ని టైపు చేయండి. అంతే ఎంటర్ కొడితే ఎటువంటి సైట్ అయిన తెలుగు లో కనపడుతుంది.
EXAMPLE: ఎన్టీవీ డాట్ కాం ని ఓపెన్ చేయాలంటే
http://uni.medhas.org/unicode.php5?file=http://ntvtelugu.com
అని టైపు చేయాలి..
కొస మెరుపులు: ఐతే ఇక్కడ మీరు కొన్ని జాగ్రత్తలు పాటించాలి
(1)మీరు .php5?file=కి ఆనుకొని మాత్రమె టైపు చేయాలి.
(2)అలాగే www. అని కూడా టైపు చేయకూడదు.
ఈ రెండు జాగ్రత్తలు మీరు పయిన వున్న అడ్రస్ లో గమనించగలరు.(2)అలాగే www. అని కూడా టైపు చేయకూడదు.
ఈ జాగ్రత్తలు పాటించక పోతే ఈ క్రింది ఎర్రర్ వస్తుందిPlease give full URL (or define a default IP to redirect to)
LIST OF SITES WHICH PROVIDES MAIL SERVICE.
ఈ క్రింది లింక్స్ ద్వారా మీరు మెయిల్ సర్వీసెస్ ని పొందగలరు, కాని యాహూ,రెడిఫ్, జీ మెయిల్ అనేవి మెయిల్ సర్వీసులకు ఫేమస్ సైట్స్.
YAHOO, REDIFF, GMAIL, HOTMAIL , SIFY, IN, HI5 , MY SPACE,
AOL, INDYA ROCKS, INDIATIMES,LINKED IN, SULEKHA,
MINGLE BOX, FRIENDSTER, BHARAT STUDENT, NEW GROUNDS


Free Nokia Video Converter - ప్రముఖ వీడియో ఫార్మేట్లను నోకియా సపోర్టెడ్ వీడియో
3GP మరియు MPEG-4 వీడియోలను నోకియా మొబైల్ ఫోన్లలో ప్లే చెయ్యవచ్చు. Free Nokia Video Converter అనే వీడియో కన్వర్టర్ ని ఉపయోగించి ప్రముఖ వీడియో ఫార్మేట్లైన AVI, MPG(MPEG), WMV, MP4, MOV, VOB, ASF, RM, RMVB, 3GP, 3G2, M4V, DAT, MKV, M4V, TS, H.264/MPEG-4 AVC(*.mp4), MPEG2 HD Video (*.mpg; *.mpeg), MPEG-4 TS HD Video(*.ts), MPEG-2 TS HD Video (*.ts), Quick Time HD Video (*.mov), WMV HD Video(*.xwmv), Audio-Video Interleaved HD Video (*.avi), DV, NUT, YUV లను 3GP మరియు MPEG-4 వీడియోలుగా మార్చుకొని దాదాపు అన్ని నోకియా మొబైల్ ఫోన్లలో ప్లే చెయ్యవచ్చు.

మరింత సమాచారం కోసం Free Nokia Video Converter సైట్ ని సందర్శించండి.
డౌన్లోడ్ : Free Nokia Video Converter

మరింత సమాచారం కోసం Free Nokia Video Converter సైట్ ని సందర్శించండి.
డౌన్లోడ్ : Free Nokia Video Converter
Free Download Telugu Ringtones

http://www.mobicomet.com/ring_tag_telugu_1.html
మెయిల్ నుండి మొబైల్ కు మెసేజ్ (SMS) పంపటం ఇలాగ
మనం gmail లేదా Yahoomail నుండి మొబైల్ ఫోన్ కు మెసేజ్ లు పంపటం చాలా తేలిక. సాధారణంగా మొబైల్ కు మెసేజ్ లను పంపడానికి way2sms.com లేదా 160by2.com వంటి సైట్ లను వాడుతుంటాం. కొన్ని కారణాలవల్ల అప్పుడప్పుడు అవి ఓపెన్ అవ్వవు. అటువంటప్పుడు మనం gmail లేదా yahoomail నుండి కూడా మెసేజ్ లను పంపవచ్చును. కాని ఇలా పంపడానికి తప్పనిసరిగా 160by2.com లో రిజిస్ట్రేషన్ చేసుకుని ఉండాలి.
మెయిల్ లో (ఏదయినా) కంపోజ్ మెయిల్ చేసిన తరువాత To (పంపవలసిన ఐడి) ప్రాంతంలో మెసేజ్ స్వీకరించే వారి "మొబైల్ నంబరు@160by2.com" అని టైప్ చెయ్యాలి. తర్వాత Subject ప్రాంతంలో మీ 160by2.com లోని ఐడిని (or your registered Phone Number) టైప్ చెయ్యాలి. తర్వాత సమాచారం వ్రాయవలసిన ప్రాంతంలో సమాచారాన్ని వ్రాసి send నొక్కాలి. అంతే ........ మీరు పంపిన సమాచారం sms రూపంలో చేరవలసిన వ్యక్తికి చేరుతుంది.
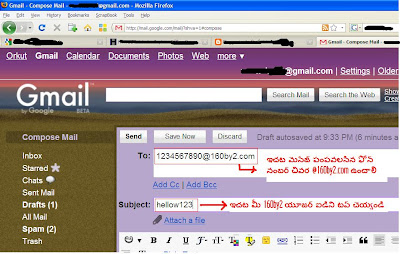
Yahoomail ద్వారా కూడా మొబైల్ కు 160by2.com ప్రమేయం లేకుండా పంపవచ్చును కాని అచట చిన్న limitation ఉండటం వలన మనకు ఇబ్బందికరంగా ఉంటుంది. అదేమిటంటే ప్రతి 5 smsలు yahoomail నుండి పంపిన ప్రతిసారి receiver నుండి కనీసం ఒక రిప్లై రావాలి. రిప్లైకి ఒక్కో ఆపరేటర్ ఒక్కోవిధంగా చార్జ్ చేస్తారు కాబట్టి 160by2.com ద్వారా sms పంపటం ఉత్తమం మరియు చాలా సులభం.
మెయిల్ లో (ఏదయినా) కంపోజ్ మెయిల్ చేసిన తరువాత To (పంపవలసిన ఐడి) ప్రాంతంలో మెసేజ్ స్వీకరించే వారి "మొబైల్ నంబరు@160by2.com" అని టైప్ చెయ్యాలి. తర్వాత Subject ప్రాంతంలో మీ 160by2.com లోని ఐడిని (or your registered Phone Number) టైప్ చెయ్యాలి. తర్వాత సమాచారం వ్రాయవలసిన ప్రాంతంలో సమాచారాన్ని వ్రాసి send నొక్కాలి. అంతే ........ మీరు పంపిన సమాచారం sms రూపంలో చేరవలసిన వ్యక్తికి చేరుతుంది.
Yahoomail ద్వారా కూడా మొబైల్ కు 160by2.com ప్రమేయం లేకుండా పంపవచ్చును కాని అచట చిన్న limitation ఉండటం వలన మనకు ఇబ్బందికరంగా ఉంటుంది. అదేమిటంటే ప్రతి 5 smsలు yahoomail నుండి పంపిన ప్రతిసారి receiver నుండి కనీసం ఒక రిప్లై రావాలి. రిప్లైకి ఒక్కో ఆపరేటర్ ఒక్కోవిధంగా చార్జ్ చేస్తారు కాబట్టి 160by2.com ద్వారా sms పంపటం ఉత్తమం మరియు చాలా సులభం.
బ్లాగింగ్ ట్యుటోరియల్స్ మరియు ఉచిత టెంప్లేట్స్ కోసం ఒక మంచి సైట్
మీరు క్రొత్తగా బ్లాగ్ ని ప్రారంభించాలను కొంటున్నారా... ఆల్రెడీ వున్న బ్లాగ్ ని అందంగా మరియు ఆకర్షణీయంగా తీర్చిదిద్దాలనుకొంటే కనుక బ్లాగింగ్ ట్యుటోరియల్స్ మరియు ఉచిత టెంప్లేట్స్ కోసం http://www.blogspottutorial.com/ సైట్ ని సందర్శించండి. ఇక్కడ ట్యుటోరియళ్ళు సచిత్రంగా స్క్రీన్ షాట్ల తో స్టెప్ బై స్టెప్ సులభంగా అర్ధమయ్యేరీతిలో ఉంటాయి. అలానే ఉచిత టెంప్లేట్స్ ని కూడా డౌన్లోడ్ చేసుకోవచ్చు.

ఇది బ్లాగర్స్ కి ఉపయోగపడే ఒక మంచి సైట్...
Blogger కీ బోర్డ్ షార్ట్ కట్స్:
[Ctrl] + [B] - Bold
[Ctrl] + [I] - Italic
[Ctrl] + [L] - Blockquote
[Ctrl] + [Z] - Undo
[Ctrl] + [Y] - Redo
[Ctrl] + [Shift] + [A] - Add hyperlink
[Ctrl] + [Shift] + [P] - Preview
[Ctrl] + [D] - Save as draft
[Ctrl] + [P] - Publish
[Ctrl] + [S] - Save
[Ctrl] + [G] - Indic script transliteration
Subscribe to:
Posts (Atom)